Hydrangeas are my personal favourites due to their stunning, voluminous blooms that add colour for months in my garden. The best part about them is that you can propagate the plants to fill more spaces or gift it to friends and family.
But how to propagate hydrangeas? Propagating hydrangea cuttings is pretty easy to do. Whether you are gonna succeed or not, it depends on the timings, growing conditions and most importantly, your patience!
If you have found the right hydrangea variety for your space and want to multiply it, continue reading this article, where I have mentioned the propagation methods and aftercare measures of this flowering plant.
How to Propagate Hydrangeas? 3 Simple Ways
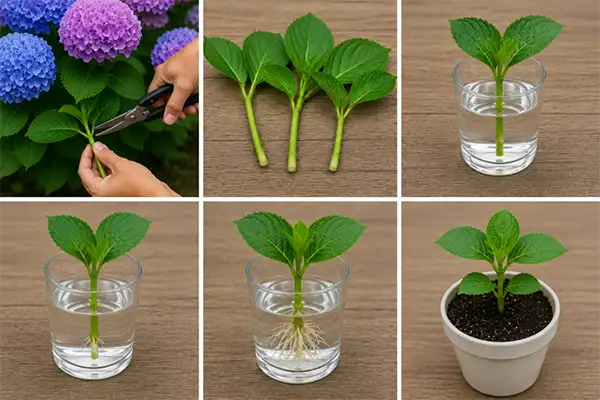
The best way to propagate hydrangea is by the cutting method. It is incredibly easy to do, in which you have to snip a 6-inch-long stem just below the leaf node. Remove the lower leaves and dip them in the rooting hormone. Plant each hydrangea clipping in the potting mix and cover it with the plastic bag to lock in moisture.
The other methods of how to propagate hydrangea involve the water propagation method and the ground layering method. Take a look below to understand the detailed steps of each method:
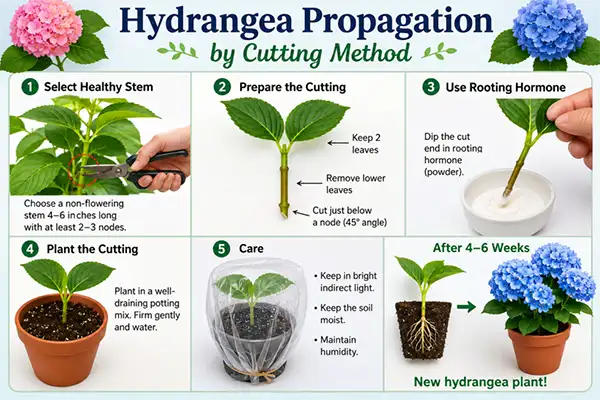
1. Stem Cutting Method
Tools and Materials Needed
- Pruners or shears
- Rooting Hormone Powder
- Pots
- Regular potting soil or propagation mix
- Clear Plastic Bag
- Hydrangea plant
- Take a Stem: Take a cutting from the plant, in the morning when the plant is most hydrated. Choose a healthy, flexible stem about 6-8 inches long that does not have a flower.
- Make a Cut: With a sharp, sterilised pair of shears, snip a 6-inch section just below a leaf node (bump where the leaves emerge). This is the place where roots form.
- Prepare the Cuttings: With the shears, carefully remove all the leaves except the top two. If the leaves are very large, trim them in half horizontally.
- Plant the Prepared Cuttings: Dip the cut end into the hydrangea rooting hormone. With a pencil or your finger, make a hole in the soil and place each powdered cutting in it. Gently firm the soil around it so that it can stand upright.
- Humidity and Sunlight: Place a plastic bag over the pot, ensuring it does not touch the cuttings. Keep the pot in bright, indirect sunlight. Also, water it consistently, ensuring that it doesn’t dry out or become soggy.
- Check for Roots: After about 4 weeks, give the stem a gentle tug. If it resists, the roots have formed. Transfer them into the larger pots, and provide proper watering. Let them harden off for at least a month before transplanting them into the garden.
2. Ground Layering Method
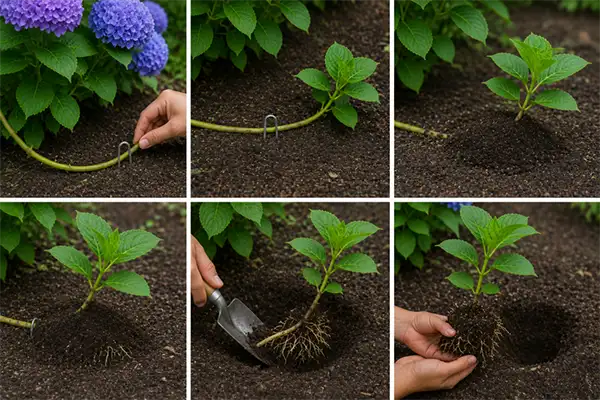
My grandmother prefers this method due to its high success rate. This is the best method if you have a mature, low-hanging hydrangea branch in your garden. You can root it while it is still attached to its mother plant.
- Select a Branch: Select a healthy softwood stem of the parent plant that is close to the ground.
- Prepare the Branch: Bend the branch down to the ground. Using clean shears, create a small notch on the underside of the selected branch to encourage its rooting.
- Anchor the Branch: Use the soft tie or garden stake to secure the branch, ensuring the area where you created the notch is in contact with the soil.
- Cover with Soil: Cover the notched area with soil, leaving the tip exposed. You can also add mulch to retain the moisture.
- Water Consistently: Water regularly and wait for root development. It may take several weeks, depending on the growing conditions.
- Transplanting: Once you see the healthy root system. Clip it from the parent plant and transplant it.
3. Water Propagation
I haven’t tried the water propagation method. Many planters have reported that it is not a reliable method as it creates a weaker root system and does not transplant well in the soil. However, you can give this soil-less method a try, as it is quite easy to do.
- Preparation of the Cuttings: Prepare your cuttings exactly as you did in the cutting method above.
- Water Placement: Place them in the glass of water, but the leaves should not sit in the water.
- Change the Water: Change the water weekly to keep it fresh and place it in the bright indirect sunlight.
- Transplanting: Once the strong root system appears in about 3-6 weeks, transplant the cutting into a pot with standard potting mix.
Some hydrangea varieties are patented and legally cannot be propagated. Some of the patented varieties are Limelight, Strawberry Sundae, Bobo, and Endless Summer. Opt for the non-patented varieties if you wish to propagate these plants.
When to Propagate Hydrangeas?
You can propagate this flowering plant anytime before it starts shedding its leaves. The best time to propagate it is in spring or early summer when there is new growth in this plant. This gives the new plant time to grow before it goes dormant in the winter season.
| Spring to early summer (best time) | At this time, you can take the softwood cuttings. They are actively growing and form roots much faster. |
| Mid to late summer | You can take the semi-hardwood cuttings that have begun to turn woody at the base. They may take a bit longer to develop a root system. |
| Fall to winter | In this season, you have to propagate from the hardwood cuttings that are dormant stems from the previous year. They are slower and more challenging to root. |
Growing Conditions and Aftercare of Hydrangea Plants
As you now know how to propagate hydrangeas in the right way. It is important to discuss the plant’s growing conditions and aftercare to make your planting journey easier.
In the hydrangea care, you need to focus on its pruning, fertilising, and repotting. Additionally, you have to understand the secrets of sunlight, water and soil of this plant to make it grow easily. Let’s see the growing conditions and care measures in detail for these best flowering plants for home gardens.
Growing Conditions of Hydrangea Plants
| Growing Zones | USDA zones 3 through 9 |
| Sunlight Requirements | Grows best in the 4-6 hours of direct morning sunlight followed by the afternoon shade. Too much intense sun can cause scorched leaves. |
| Soil Preference | Rich, well-draining potting mix with slightly acidic to neutral pH. |
| Watering Needs | Let the topsoil dry out slightly before the next watering session. It requires consistent moisture but not soggy conditions. |
Did you know?
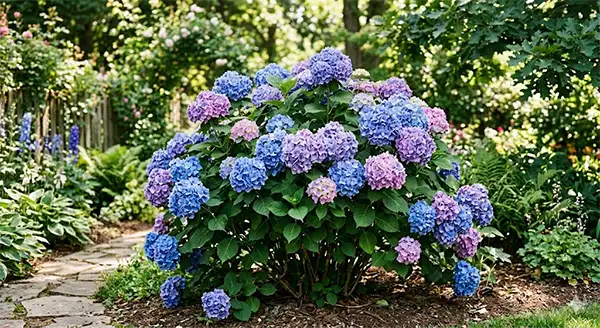
Hydrangea has the ability to change colour on the basis of the soil pH. In the acidic soil, the blooms are blue, and in the alkaline soil, the flowers are pink.
Essential Care Measures for Hydrangeas
- Fertilising
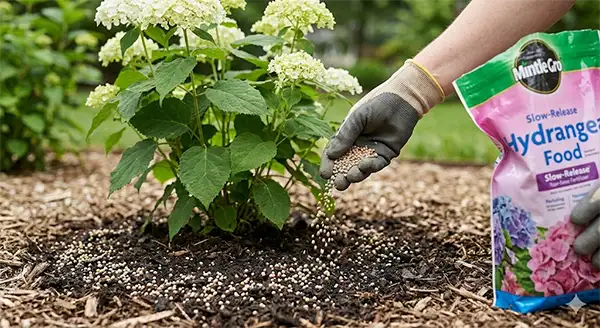
This flowering plant needs regular nutrition to produce the abundant blooms. Feed it with a balanced fertiliser during its growing season. Avoid excessive nitrogen, which leads to the production of lush leaves but inhibits blooming.
- Pruning
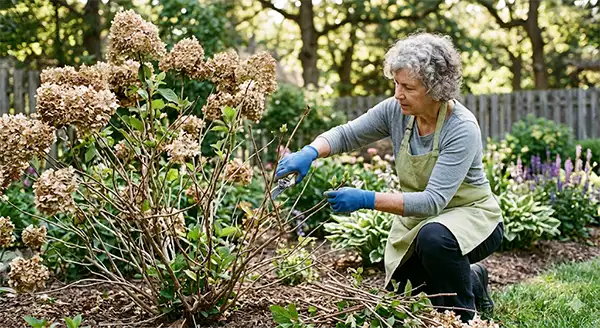
Prune Hydrangea in late summer or early autumn. Focus on removing the deadhead faded blooms, diseased stems and lightly shape the plant to maintain its structure. As it blooms on old wood, avoid heavy pruning in spring or early summer.
- Repotting
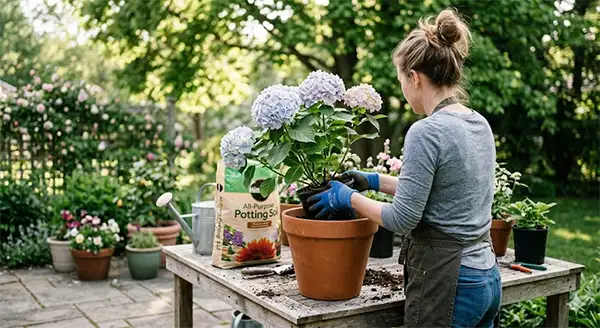
Repot the plant every 2-3 years to give the roots space to grow and refresh the soil. Use a slightly larger container and high-quality potting mix. Do this in winter or early spring before its active spring growth begins.
- Winter Care
Hydrangeas are generally cold-tolerant, but the potted plants are more vulnerable to frost damage than those planted in the ground. If you live in cold states, place the pot near the south-facing wall. Furthermore, cover the plant with frost cloth and use mulching in your indoor gardening. Once the frost damage risk passes, reintroduce it to sunlight and water gradually.
Common Problems and Solutions During Hydrangea Propagation
During propagating the Hydrangea, there are some common challenges among the planters and gardeners. These problems involve wilting cuttings, no root development and pest infestations. Let’s take a look at the problems and the solutions that worked for me:
| Problem | Solution |
| Wilting Cuttings: The cuttings lose moisture, causing the stems to droop. It can happen due to improper care or environmental causes. | Strip away the lower leaves to minimise the water loss. Cut the remaining larger leaves in half. Improve humidity by covering the pot with a plastic bag. |
| Slow or No Root Development: Even after 3-4 weeks, there is no resistance when gently tucking on stems. | Always choose the green stems that do not have active flower buds. Provide sufficient light but avoid direct exposure that can scorch the leaves. |
| Pest Infestations: The plant is affected by pests like aphids, mealybug, and spider mites. They lead to leaf distortion and reduced blooming. | Regularly check the plant, and if any infestations appear, treat them promptly with neem oil or insecticidal soap. |
| Shock During Transplanting: The newly rooted plant dies or wilts after being transferred to a larger pot or to the ground. | Harden off the plant for the initial 1-2 weeks by placing it in the outside environment for a few hours first. Gradually introduce them to the new environment. Transplant it into the area with morning sun and afternoon shade. |
Frequent Queries On Hydrangea Propagation
I have found some frequent queries regarding how to propagate hydrangeas. The common questions are about the identification of its roots, the right manner of propagation in a large plant and the next steps if the roots have already emerged.
- Query: Tasty_Masterpiece_57 in hydrangea propagation is curious to know if the white bumps in the image are the early signs of life in his Hydrangea.
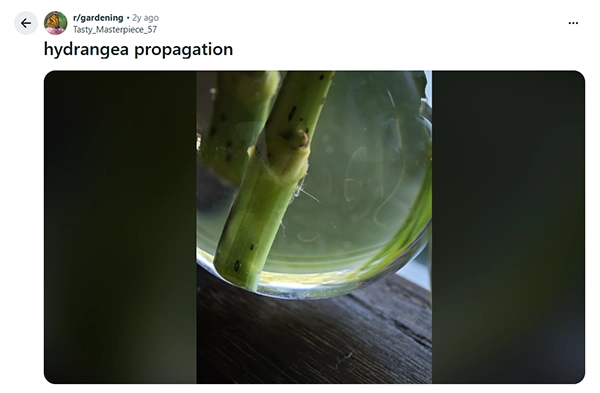
Solution: Yes, the tiny white bumps are likely the early root growth. Keep the cutting in water. Change the water every few days and place it in bright indirect sunlight. Once the strong root system appears, transfer it to the soil.
- Query: good_guy112 in I’m hoping for some help with propagating this hydrangea. asks about the right way to propagate his large hydrangea plant.
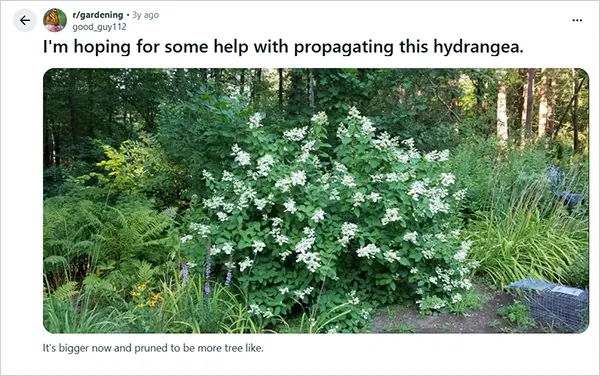
Solution: The flowering plant can be propagated easily following either the stem cutting method or the water propagation method. For this, cut a healthy green stem just below the node and remove all the lower leaves. Place the cutting in water or moist soil. Place it in bright indirect light. In a few weeks, roots will form, and it will be ready to be transplanted.
- Query: suchkelly33 asks in Help with cutting that accidentally rooted about the propagation method of the already rooted cutting. She wants to know if it needs to be pruned and how long it should be left in water.
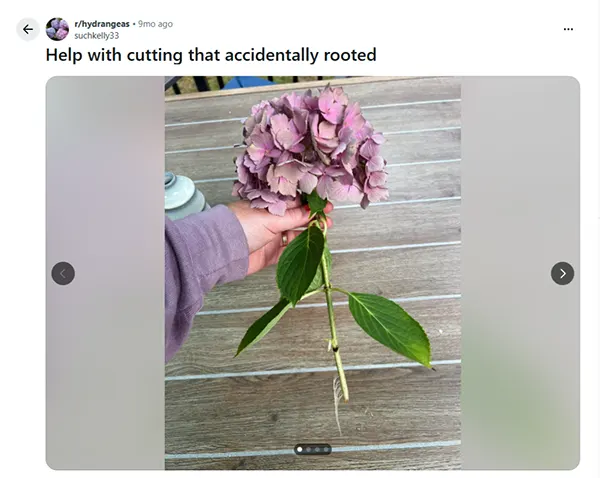
Solution: Since the roots have already developed, it needs to be rooted in the moist, well-draining soil soon. I would suggest pruning the flower for faster root growth. Keep the soil consistently moist and place it in bright indirect light to encourage its growth.
Winding Up
Hydrangea plants are best for home gardens with their bold ball-shaped blooms. Whether you are doing Hydrangea cuttings propagation or the ground layering method, it is as easy as their aftercare.
If you want to see the fast root development and blooming, follow the above-mentioned methods of how to propagate hydrangeas and their care measures. Also, protect the shrub from environmental stress and pest infestations. With little attention, you can beautify diverse spaces with these dramatic, lovely blooms.
Can you propagate hydrangeas in water?
Yes, the plant can be propagated in water. For this, take a healthy cutting that is about 6-8 inches long. Remove the bottom leaves and place the cut end in the glass of water. Change water every few days and place it in bright indirect light. When the strong root system develops, transplant it to the soil.
How to take cuttings from hydrangea?
Choose a healthy soft green cutting without any flowers. Cut 4-6 inches below the leaf node. Remove the leaves at the bottom, leaving only the 2-3 on top.
Do hydrangeas multiply on their own?
They don’t multiply on their own through seed dispersal, but they may propagate themselves through layering. Though this is rare and does not typically happen without the gardener’s assistance.
How long will hydrangea cuttings take to form new roots?
The flowering plant develops new roots in three to four weeks, depending on the growing conditions.
When is the best time to take hydrangea cuttings?
The best time to take a hydrangea cutting is in the morning, during spring or early summer.
- How to take hydrangea cuttings – BBC Gardeners’ World Magazine
- How to grow hydrangeas – BBC Gardeners’ World Magazine
- Hydrangea Cultivation: Advances in Propagation, Soil Management, and Disease Control – ResearchGate
- hydrangea – Britannica